1. Web proxies
- 1. Web proxies
1.1. Introduction
1.1.1. What ara web proxies?
Specialized tools that can be set up between a browser/mobile application and a backend server to capture and view all the web requests being sent between both ends, essentially acting as main-in-the-middle (MITM) tools.
While other network sniffing applications, like Wireshark, operate by analyzing all local traffic to see what is passing through a network, web proxies mainly work with web ports such as, but not limited to, HTTP/80 and HTTPS/443.
1.1.2. Burp suite
Burp is the most common web proxy for web penetration testing. It has various features and provides a built-in Chromium browser to test web applications.
The community free version should be enough for most penetration testers.
For Firefox, you can use Foxy Proxy to easily and quickly change the Firefox proxy.
1.1.3. ZAP: OWASP zed attack proxy
ZAP is a free and open-source project initiated by the OWASP and maintained by the community.
The main advantage is that we will not face any throttiling or limitations in our scans that are only lifted with a paid subscription.
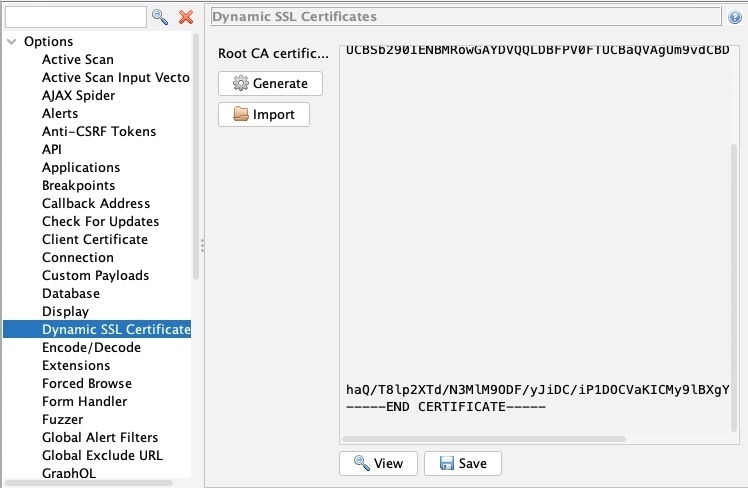
1.1.4. CA Certificates
Install the proxy's CA certificates. Otherwise, some HTTPS traffic may not get properly routed, or we may need to click accept every time Firefox needs to send an HTTPS request
For Burp, you can install it as soon as you configured it in Foxy Proxy by browsing to http://burp and download the certificate from there.
To get's ZAP CA certificate, you can go to Tools>Options>Dynamic SSL Certificate.
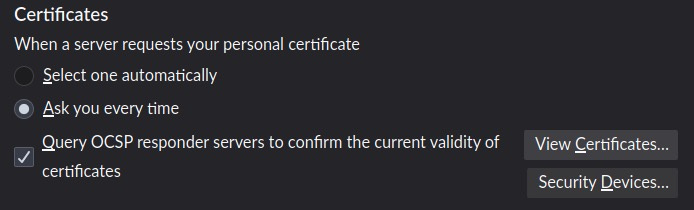
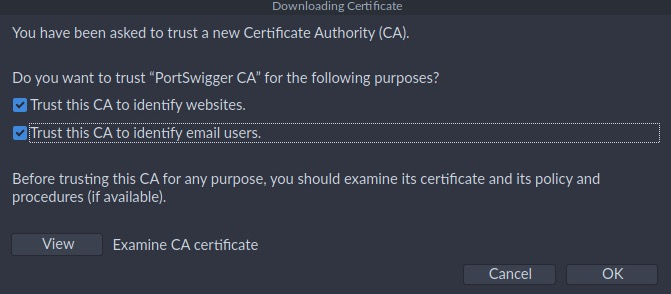
Once you have your certificates, you can install them within Firefox by navigating to , and clicking View Certificates.
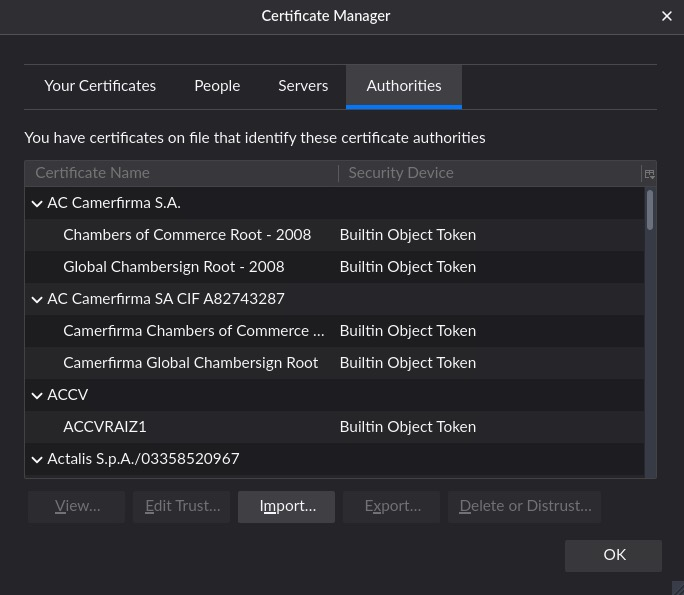
Then, select the Authorities tab, and then click on import.
Finally, mark the options as checked:
1.2. Intercepting requests
1.2.1. Manipulating requests
We can examine the request, manipulate it to make any changes we want, and then send it to its destination.
There are numeros applications for this in web penetration testing, such as testing for:
- SQL injections
- Command injections
- Upload bypass
- Authentication bypass
- XSS
- XXE
- Error handling
- Deserialization
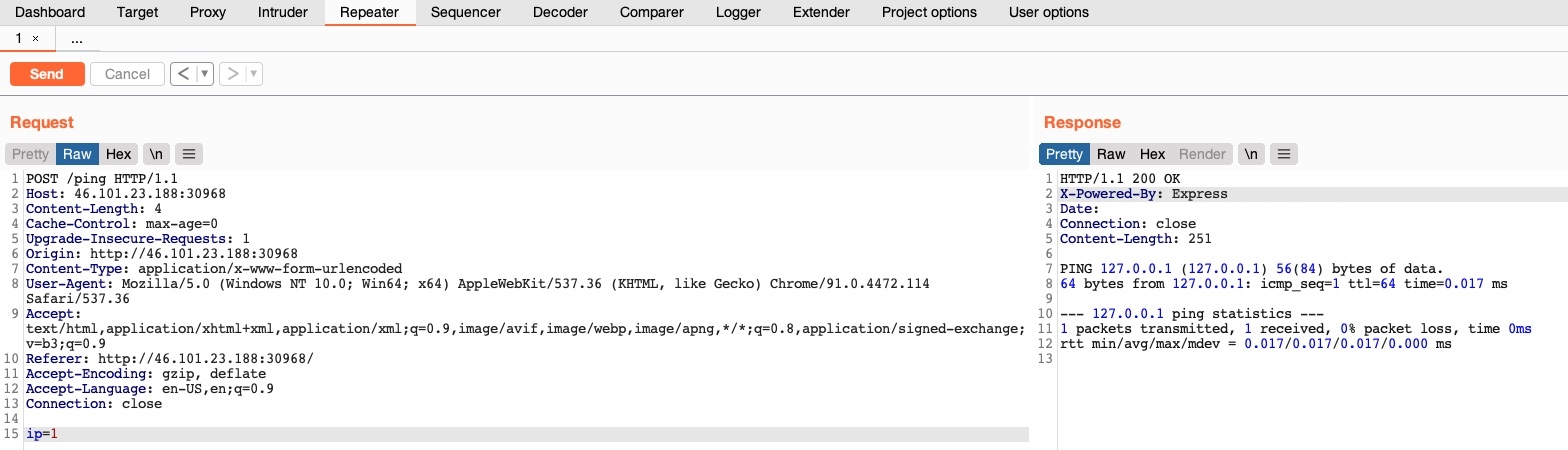
For example, you might change an HTTP body param like id=1 to id=;ls;.
1.3. Intercepting responses
In some instances, we may need to intercept the HTTP responses from the server before they reach the browser. This can be useful when we want to change how a specific page looks, like enabling certain disabled fields or showing certain hidden fields.
Consider the following example of an intercepted response:

You could change the type="number" on line 27 to type="text", which should enable us to write any value we want. We will also change the maxlength="3" to maxlength="100" so we can enter longer input.
1.3.1. Burp
Enable response interception in Proxy>Options by enabling Intercept Response under Intercept Server Responses.
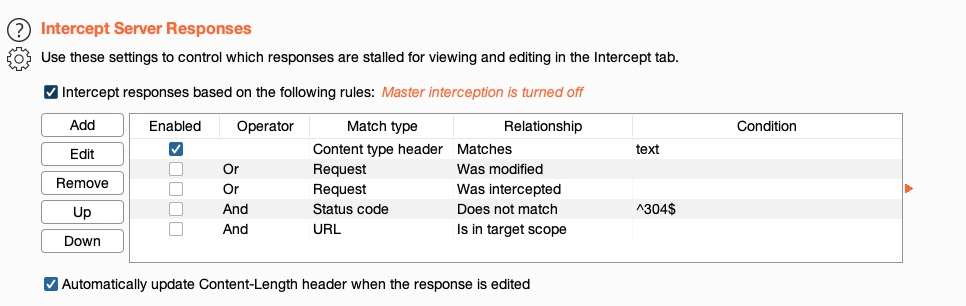
After that we can enable request interception once more and refresh the page with CTRL+SHIFT+R in our browser (to force a full refresh). Once we forward the request, we'll see our intercepted response.
Burp has a handy feature to Unhide hidden form fields under Proxy>Options>Response modification.
1.3.2. ZAP
ZAP intercepts the response by default, you just need to click on Step after intercepting a request.
We can use ZAP HUD also to Show/Enable buttons/inputs without needing to intercept the response or refresh the page.
1.4. Automatic modification
We may want to apply certain modifications to all outgoing HTTP requests or all incoming HTTP responses in certain situations. In these cases, we can utilize automatic modifications on rules we set.
1.4.1. Automatic request modification
We can choose to match any text within our requests, either in request header or request body, and then replace them with different text. For example, replace User-Agent with HackTheBox Agent 1.0.
Burp provides this in Proxy>Options>Match and Replace and click on Add.
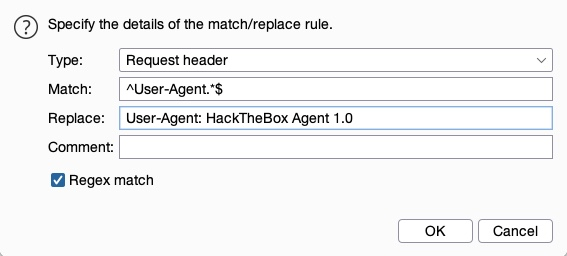
The Match and Replace option will be added and enabled and will start automatically replacing the User-Agent header in our requests.
ZAP provides a similar feature called Replacer, which we can access by pressing CTRL+R.
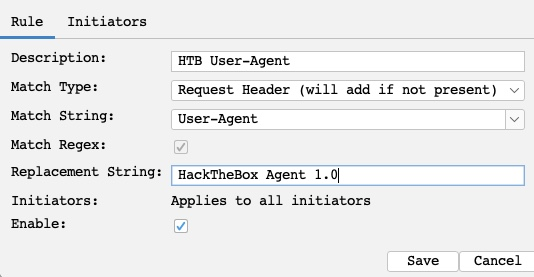
ZAP also provides Request Header String that we can use with a Regex pattern and the option to set Initiators, which enable us to select where our Replacer option will be applied. You can then enable request intercepton by pressing CTRL+B and visit any page in the pre-configured ZAP browser.
1.4.2. Automatic response modification
In Burp, use Proxy>Options>Match and Replace to add a rule. Use Type: Response body.
1.5. Repeating requests
Request repeating allows us to resend any web request that has previously gone through the web proxy. This allow us to make quick changes to any request before we send it, then get the response within our tools without intercepting and modifying each request.
1.5.1. Proxy History
You can view the HTTP requests history in Burp at Proxy>HTTP History.

In ZAP HUD, you can find it in the bottom History (or the History tab at ZAP's main UI).

1.5.2. Configure repetition
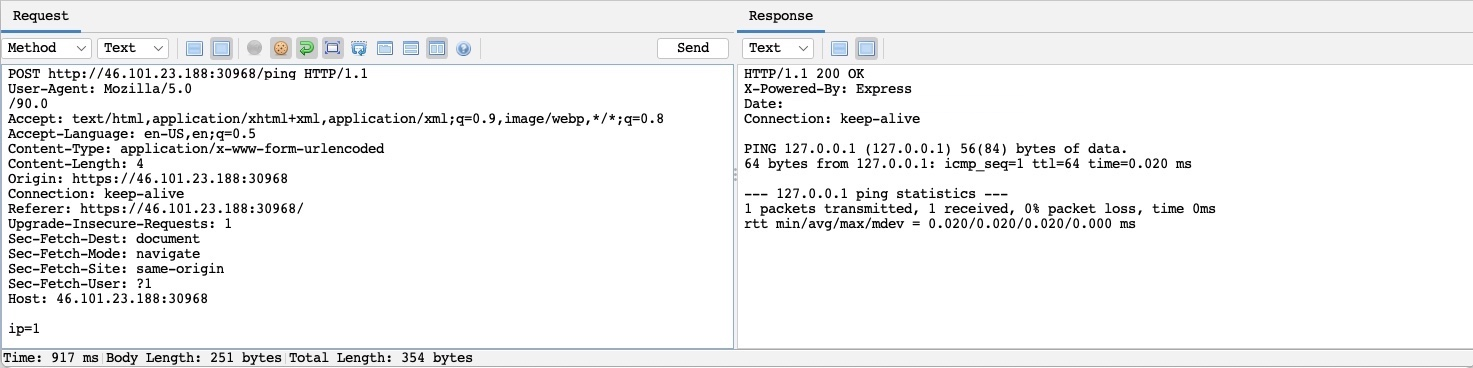
In Burp, press CTRL+R in Burp to send it to the Repeater tab (navigate to it with CTRL+SHIFT+R). Once in Repeater, we can click on Send to send the request.
In ZAP, right-click on the request and select Open/Resend with Request Editor.
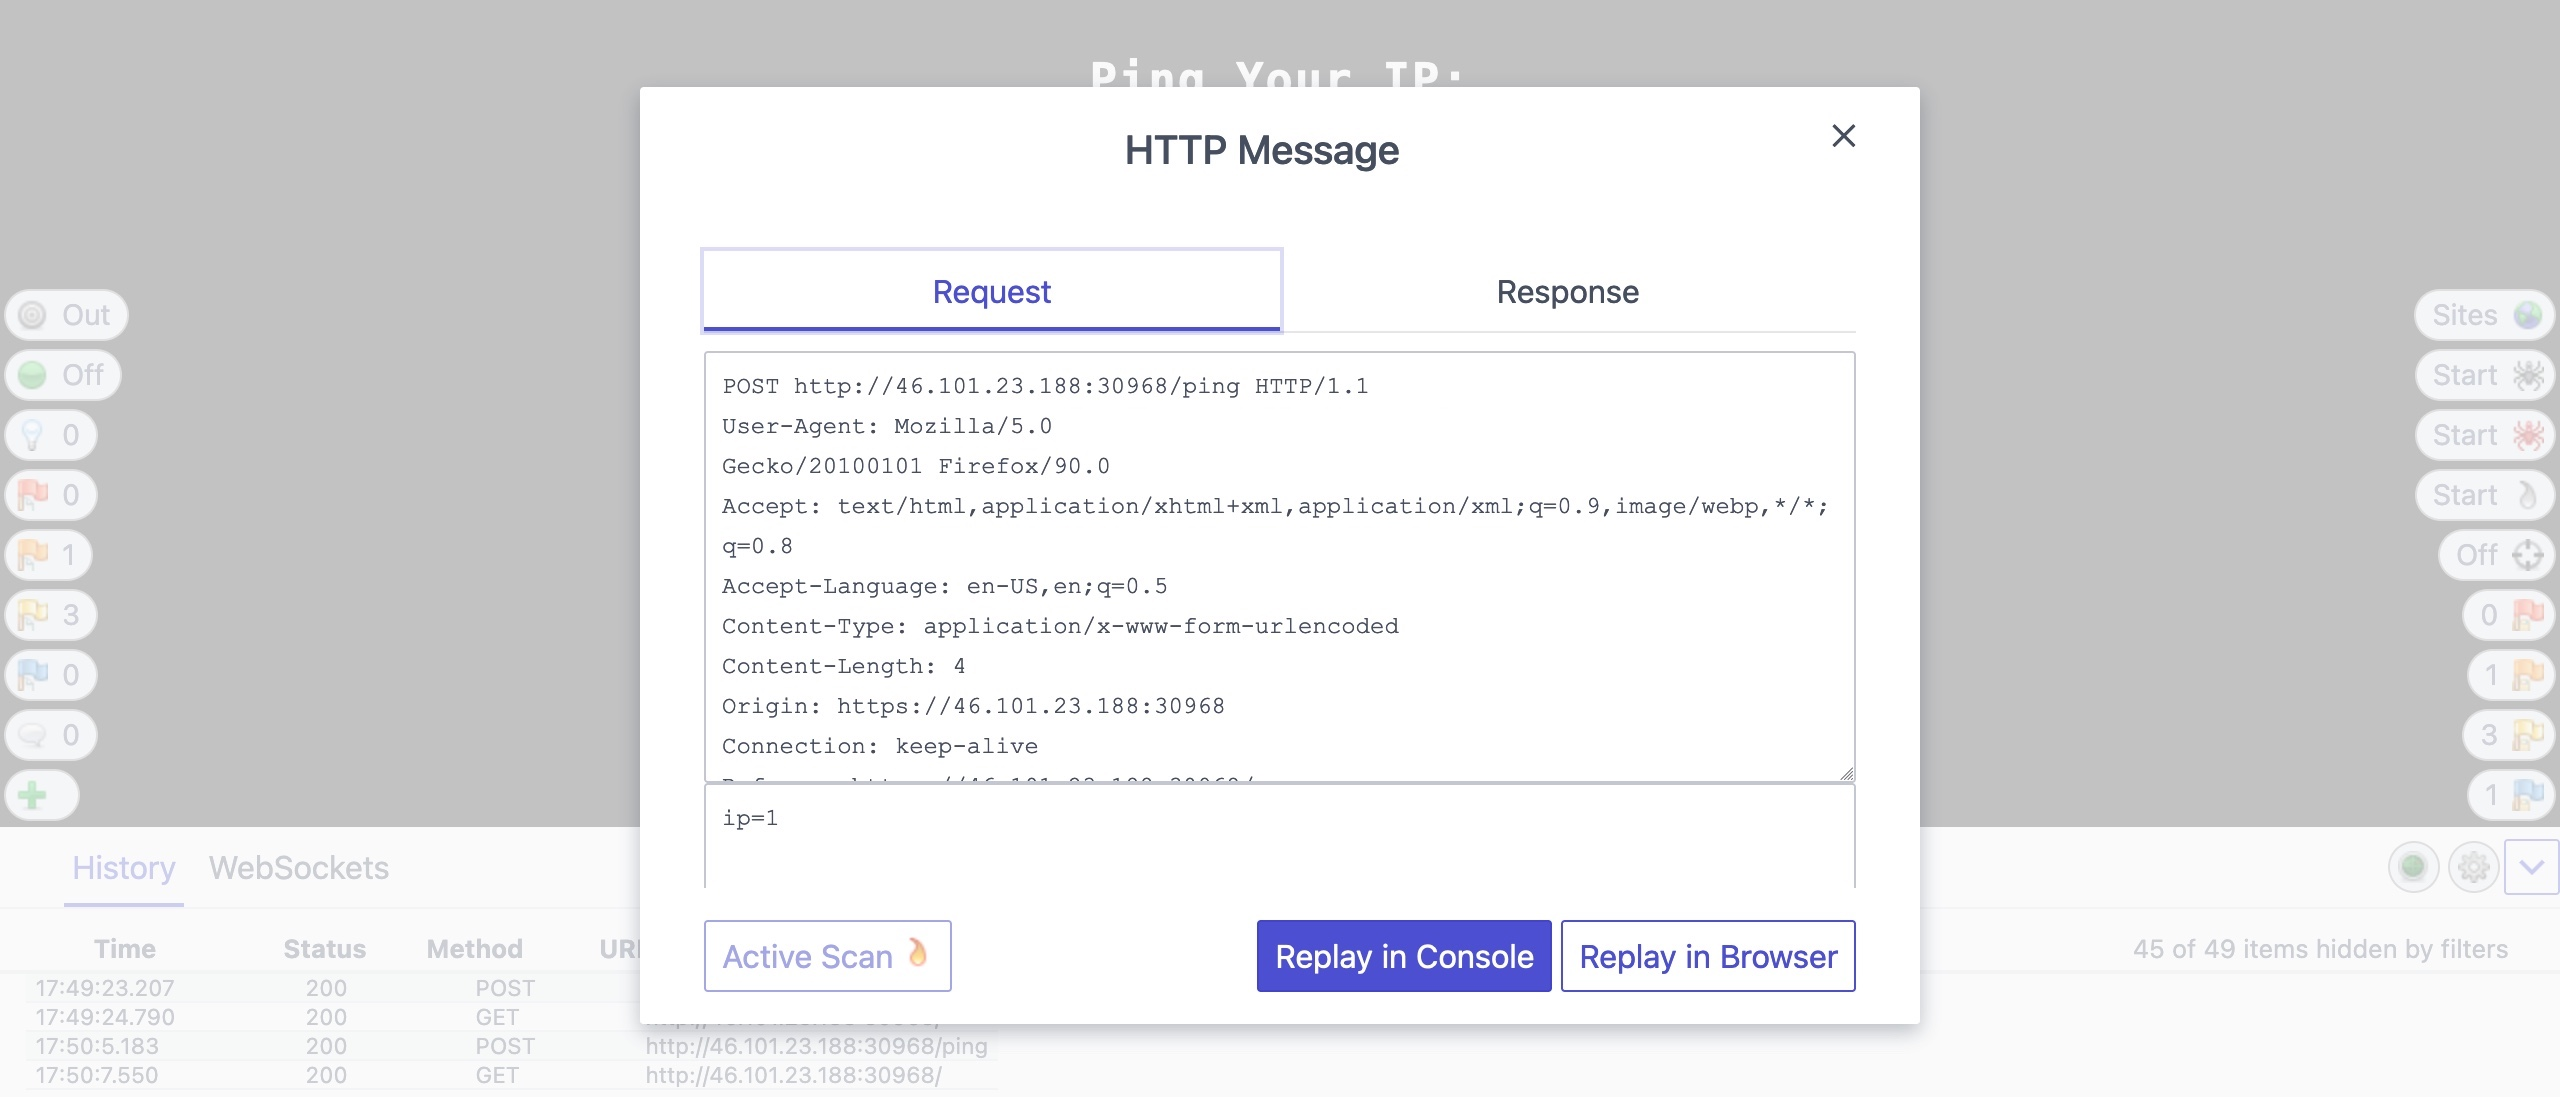
You can achieve the same with ZAP HUD, click on a request in the bottom History pane, and the Request Editor will be shown. You can select Replay in Console to get the response in the same HUD window, or select Replay in Browser to see the response rendered in the browser.
1.6. Encoding/Decoding
1.6.1. URL Encoding
Request data must be URL-encoded and our request headers correctly set. For example, Spaces, & and # should be encoded.
In Burp Repeater, we can select text and right-click on it, then select Convert Selection>URL>URL encode key characters or pressing CTRL+U.
On the other hand, ZAP automatically URL-encode all of our request data in the background before sending the request.
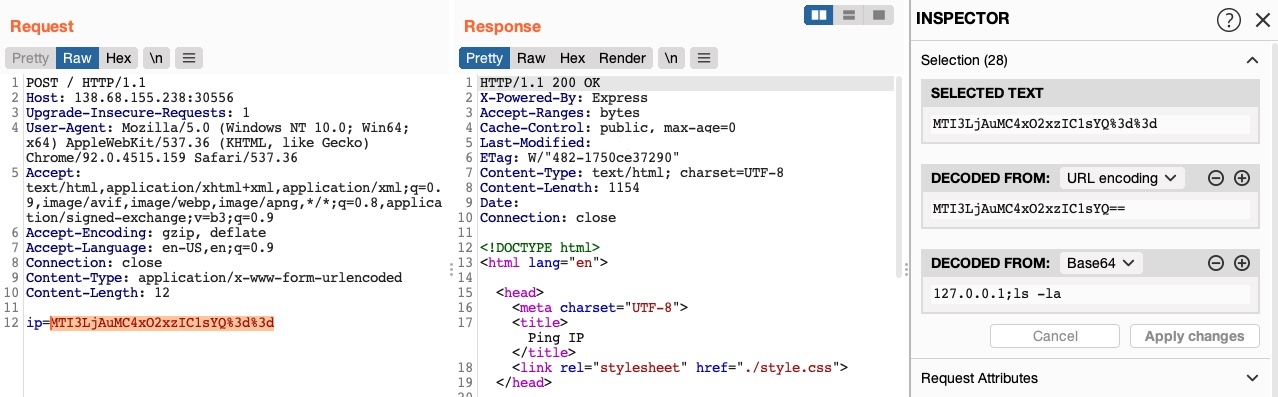
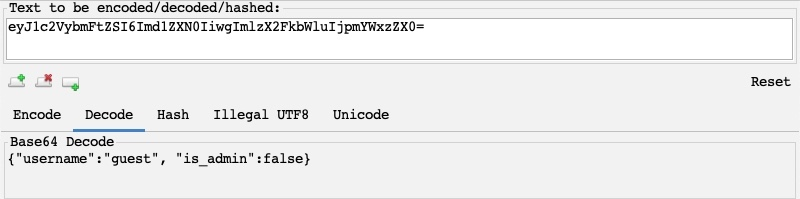
1.6.2. Encoder/Decoder tool
Web applications commonly encode their data, so we should be able to quickly decode it to exmaine the original text.
In Burp, we can go to the Decoder tab.

In recent versions of Burp, you can also use the Burp Inspector to perform encoding and decoding (in various places like Burp Proxy or Burp Repeater).
In ZAP, we can use the Encoder/Decoder/Hash by pressing CTRL+E.
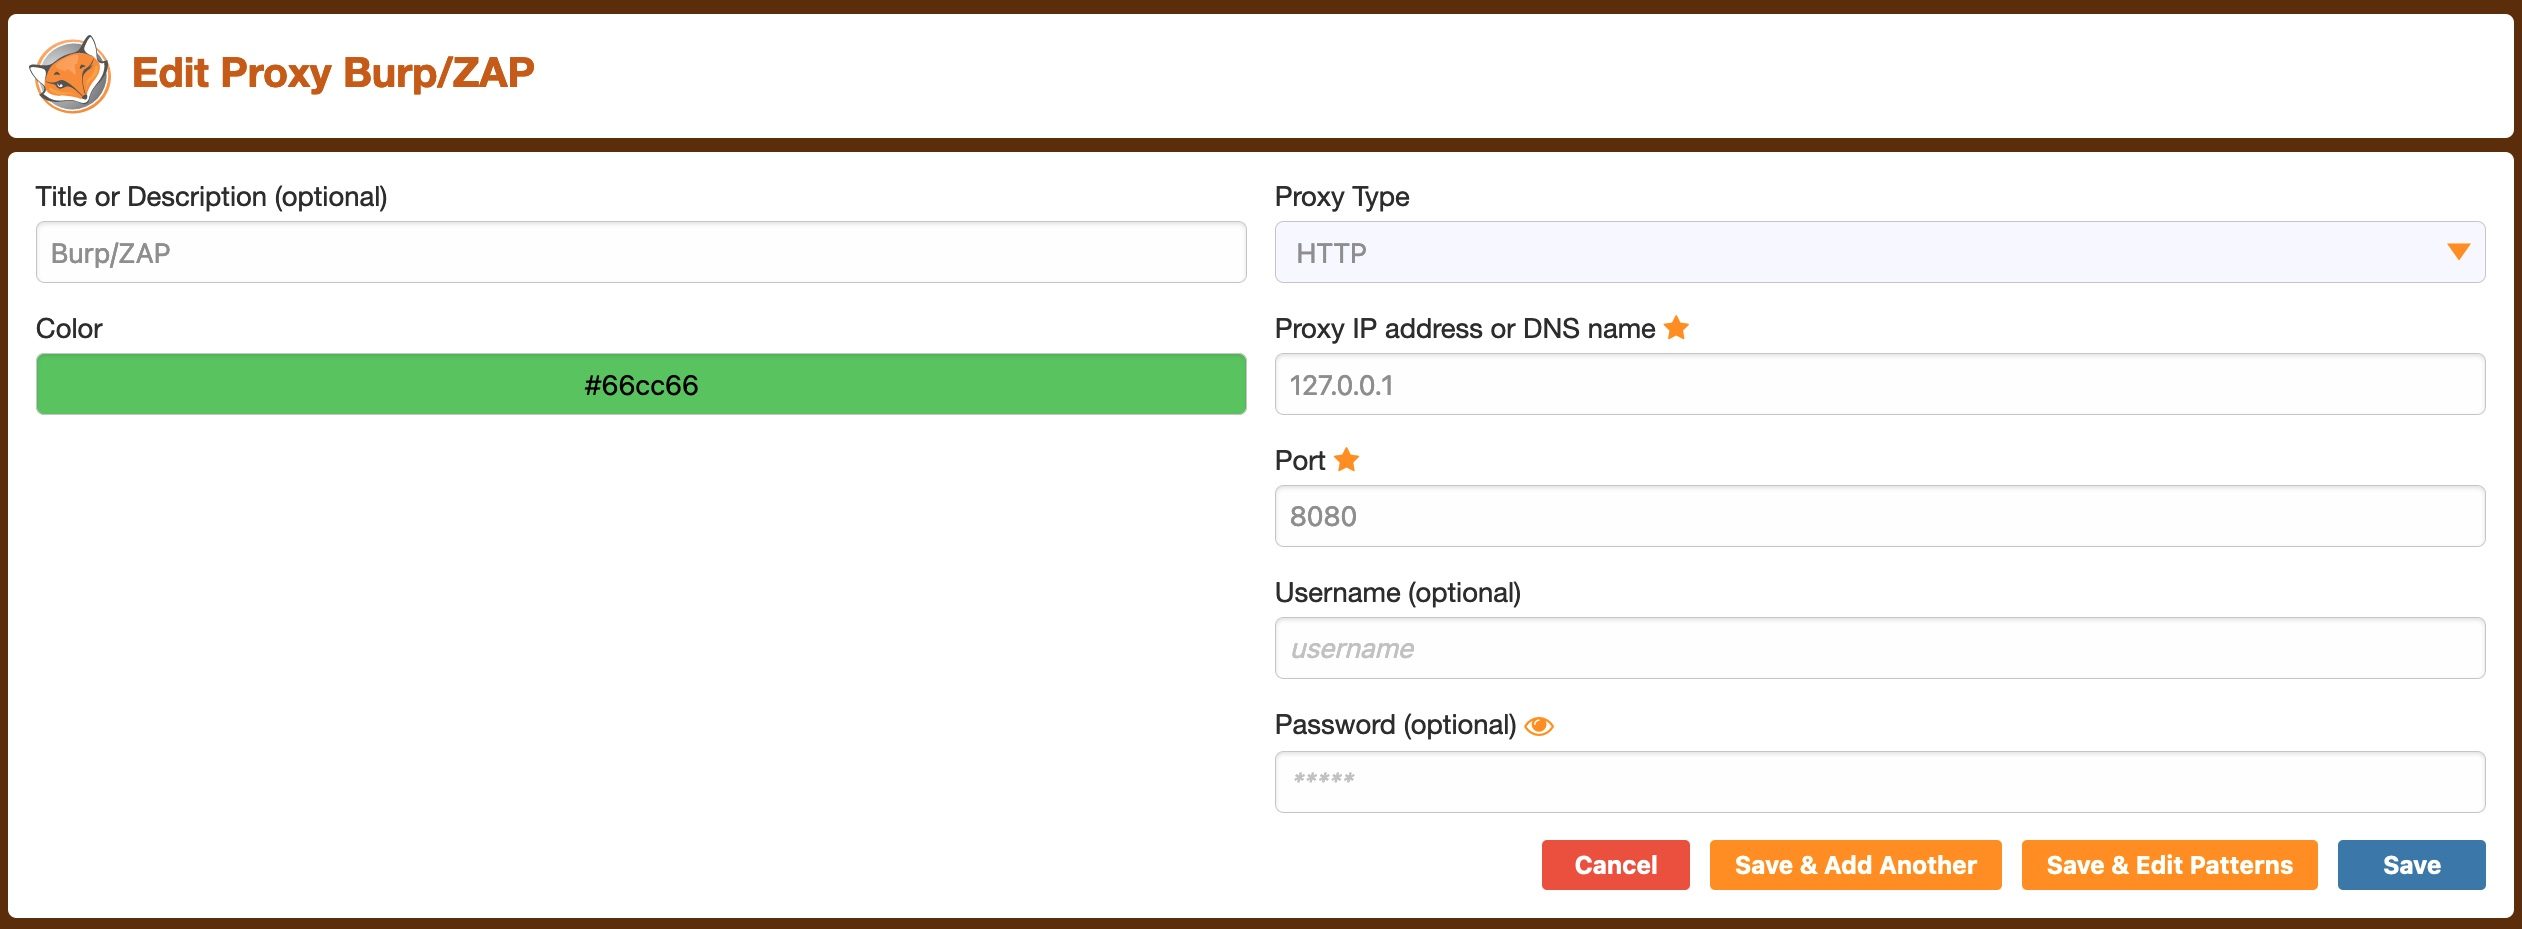
1.7. Proxying tools
We might want to intercept HTTP requests made by CLI tool or client applications. To route all requests made by a specific tool through our web proxy tools, we have to set them up as the tool's proxy (i.e., http://127.0.0.1:8080), similarly to what we do with our browsers. Each tool may have a different method.
1.7.1. Proxychains
A very useful tool in Linux is , which routes all traffic coming from any CLI tool to any proxy we specify.
Simply edit /etc/proxychains.conf to look like this
#socks4         127.0.0.1 9050
http 127.0.0.1 8080
You might want to enable Quiet Mode to reduce noise by un-commenting quiet_mode.
Afterwards, prepend proxychains to any command, and the traffic of that command should be routed through it.
proxychains curl http://SERVER_IP:PORT
1.7.2. Nmap
You can see the proxy configuration for Nmap in its help page:
nmap -h | grep -i prox

--proxies <url1,[url2],...>: Relay connections through HTTP/SOCKS4 proxies
We should also add the -Pn flag to skip host discovery. Also, we'll use the -sC flag to examine what an nmap scan does:
nmap --proxies http://127.0.0.1:8080 SERVER_IP -pPORT -Pn -sC

Starting Nmap 7.91 ( https://nmap.org )
Nmap scan report for SERVER_IP
Host is up (0.11s latency).

PORT      STATE SERVICE
PORT/tcp open  unknown

Nmap done: 1 IP address (1 host up) scanned in 0.49 seconds
1.7.3. Metasploit
Using msfconsole you can se a proxy for any exploit within Metasplot by using the set PROXIES flag. Consider the following example:
msfconsole

msf6 > use auxiliary/scanner/http/robots_txt
msf6 auxiliary(scanner/http/robots_txt) > set PROXIES HTTP://127.0.0.1:8080

PROXIES => HTTP://127.0.0.1:8080


msf6 auxiliary(scanner/http/robots_txt) > set RHOST SERVER_IP

RHOST => SERVER_IP

msf6 auxiliary(scanner/http/robots_txt) > set RPORT PORT

RPORT => PORT


msf6 auxiliary(scanner/http/robots_txt) > run

[*] Scanned 1 of 1 hosts (100% complete)
[*] Auxiliary module execution completed
1.8. Web fuzzer
1.8.1. Burp Intruder
Burp Intrucer can be used to fuzz pages, directories, sub-domains, parameters, parameter values, and many other things.
Burp community version is throttled at a speed of 1 request per second, making it extremely slow compared to CLI-based web fuzzing tools, which can usually read up to 10k requests per second. The Pro version has unlimited speed.
1.8.1.1. Target
Locate a request in the Proxy History, right-click on it and Send to intruder (or press CTRL+I). Then go to Intruder or press CTRL+SHIFT+I.

1.8.1.2. Positions
This is where we place the payload position pointer, which is the point where words from our wordlist will be placed and iterated over.
For example, select DIRECTORY as the payload position, by either wrapping it with § or by selecting the word and clicking on the Add § button.
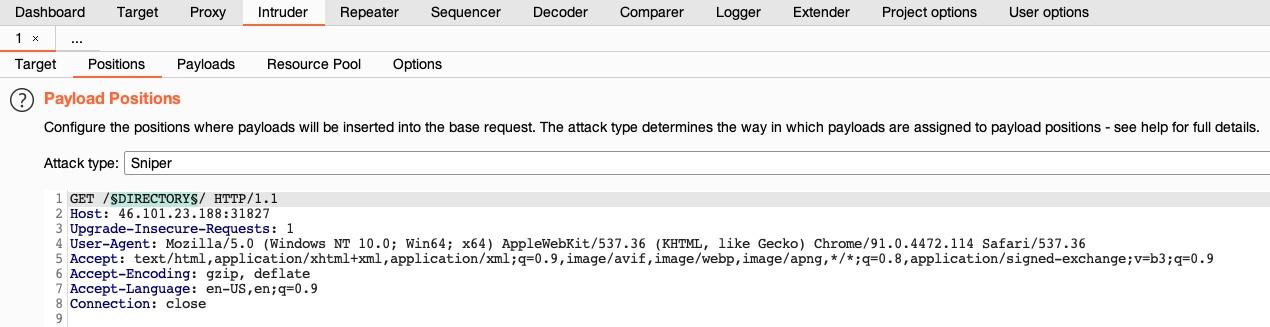
Finally, select in the target tab the Attack Type that defines how many payload pointers are used and determines which payload is assigned to which position. For simplicity, awe'll stick to the first type, Sniper, which uses only one position.
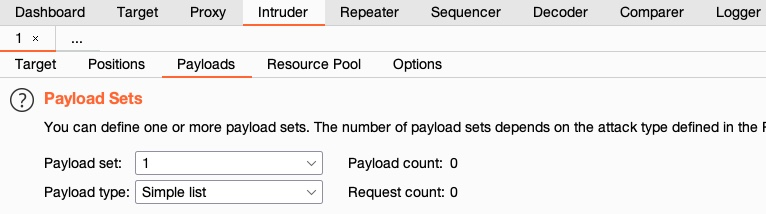
1.8.1.3. Payloads
On the third tab, Payloads, we get to choose and customize our payload/wordlists. There are four things to configure:
- Payload set: Identifies the payload number, depending on the type and number of payloads we used in the payload position pointers.
- Payload type: Type of payloads/wordlists to use (e.g., simple list, runtime file, character substitution).
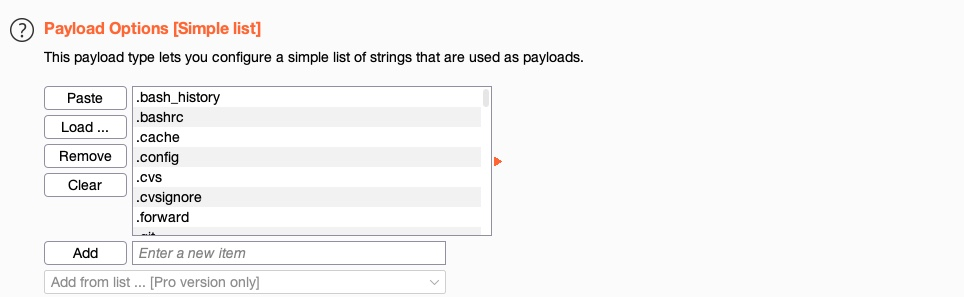
- Payload options: It's different for each payload type selected previously. For a Simple List, we have to create or load a wordlist (e.g.,
/opt/useful/SecLists/Discovery/Web-Content/common.txt).
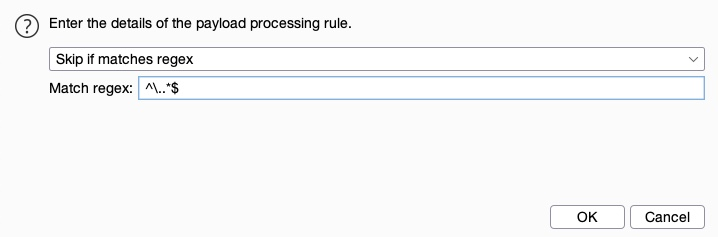
- Payload processing: Determines fuzzing rules over the loaded wordlist. For example, if we wanted to add an extension after our payload item, or filter the wordlist based on specific criteria (e.g., skip any lines that start with a
.).
- Payload encoding: Enable or disable Payload URL-encoding.

1.8.1.4. Options
Customize attack options from the Options tab.
For example, set the number of retried on failure and pause before retry to 0.
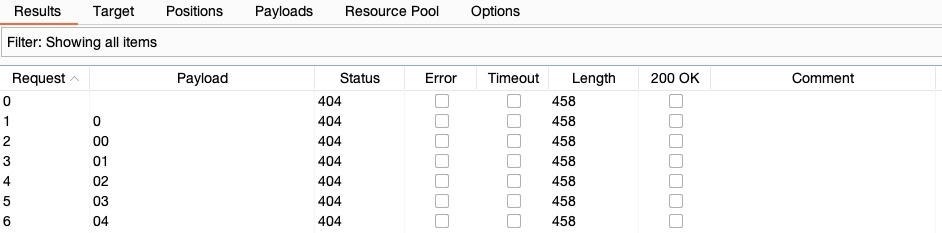
Another useful option is Grep - Match, to flag specific requests depending on their response. For example, match 200 OK requests and Exclude HTTP Headers from string matching.
You may also utilize Grep - Extract, which is useful in the HTTP responses are lengthy, and we're only interested in a certain part of the response (e.g., only responses with HTTP Code 200 OK regardless of ttheir content).
1.8.1.5. Attack
Once everything is properly set up, we can click on Start Attack and wait for our attacks to finish.
1.9. Web Scanner
1.9.1. Burp Scanner
A powerful scanner for various types of web vulnerabilities, using a Crawler for building the website structure, and Scanner for passive and active scanning.
Burp Scanner is a pro-only feature, not available in the free community version.
1.9.1.1. Target scope
To start a scan, you have the following options:
- Start scan on a specific request from Proxy History.
- Start a new scan on a set of targets.
- Start a scan on items in-scope.

In Target>Site map, you'll find a listing of all directories and files Burp has detected in various requests that went through its proxy.
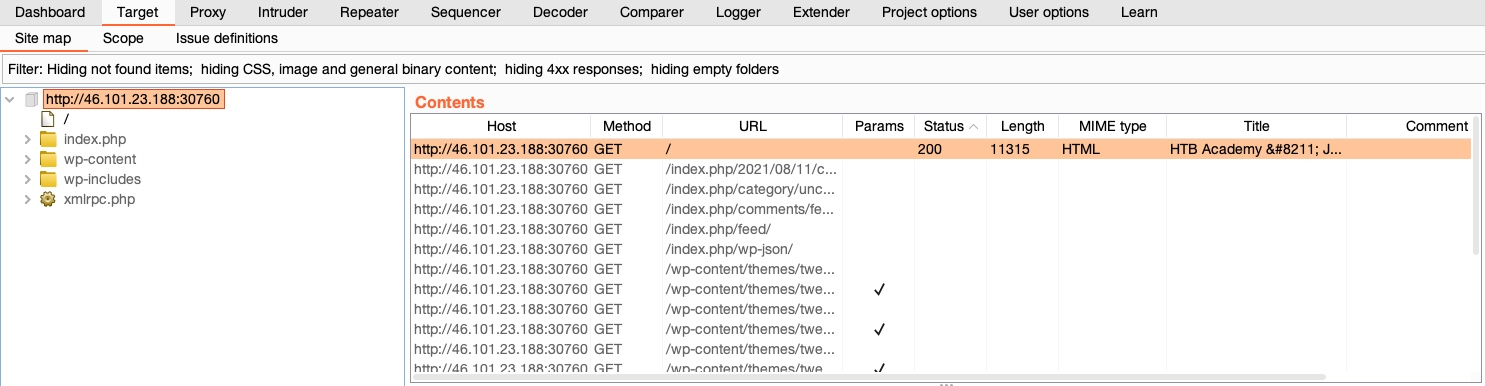
You can add an item to our target scope, by right-clicking on it and select Add to scope.

1.9.1.2. Crawler
Once the scope is ready, you can use the web crawler to navigate a website by accessing any links found in its pages, accessing any forms, and examining any requests it makes to build a comprehensive map of the website.
1.9.1.3. Passive Scanner
Once the site map is fully built, you can scan the target for potential vulnerabilities.
Unline an active scan, a passive scan does not send any new requests but analyzes the source of pages already visited in the target/scope and then tries to identify potential vulnerabilities.
This is very useful for a quick analysis of a specific target, like missing HTML tags or potential DOM-based XSS vulnerabilities.
1.9.1.4. Active Scanner
An active scan runes a more comprehensive scan than a passive one:
- Starts by running a crawl and a web fuzzer to identify all possible pages.
- Runs a passive scan on all identified pages.
- Checks each of the identified vulnerabilities from the passive scan and sends requests to verify them.
- Performs a JS analysis to identify further potential vulnerabilities.
- Fuzzes various identified insertion points and parameters to look for common vulnerabilities like XSS, Command Injection, SQLi, and other common web vulnerabilities.
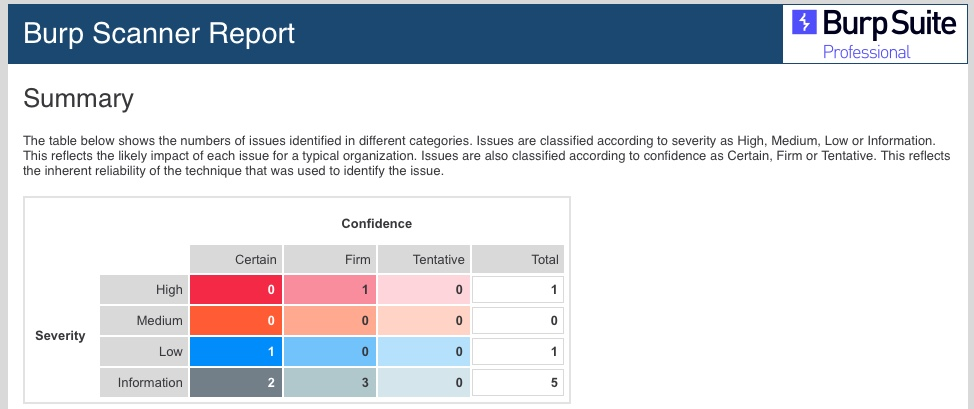
1.9.1.5. Reporting
Once all of our scans are completed, and all potential issues have been identified, you can go to Target->Site map, right-click on our target and select Issue>Report issues for this host.
1.9.2. ZAP Scanner
1.9.2.1. Spider
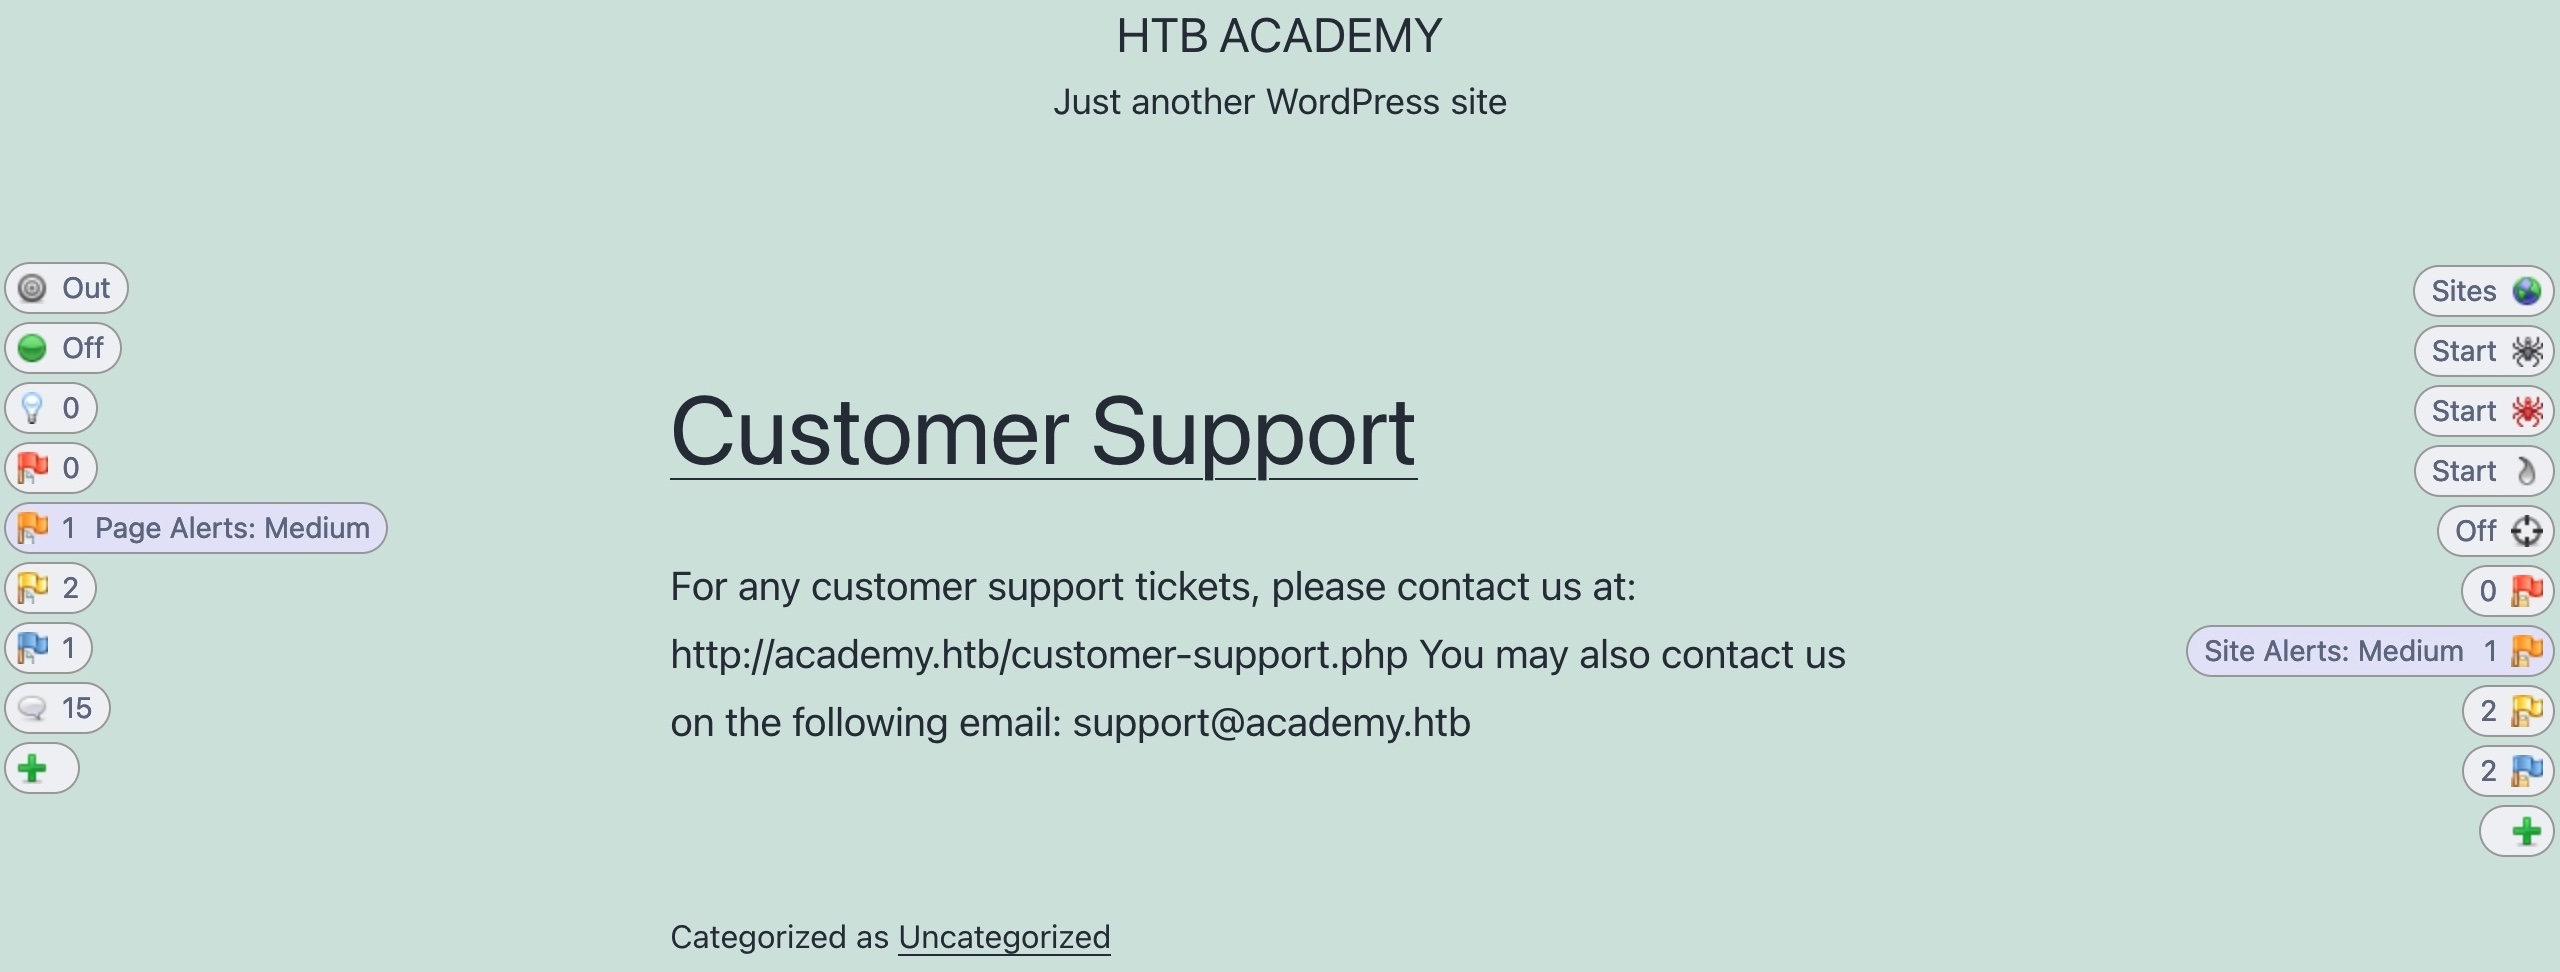
To start a Spider scan on any website, you can locate a request from the history tab and select Attack>Spider from the right-click menu. Another option is to use the HUD in the pre-configured browser, visit the page we want to start our Spider scan on, and click on the second button on the right pane Spider Start.
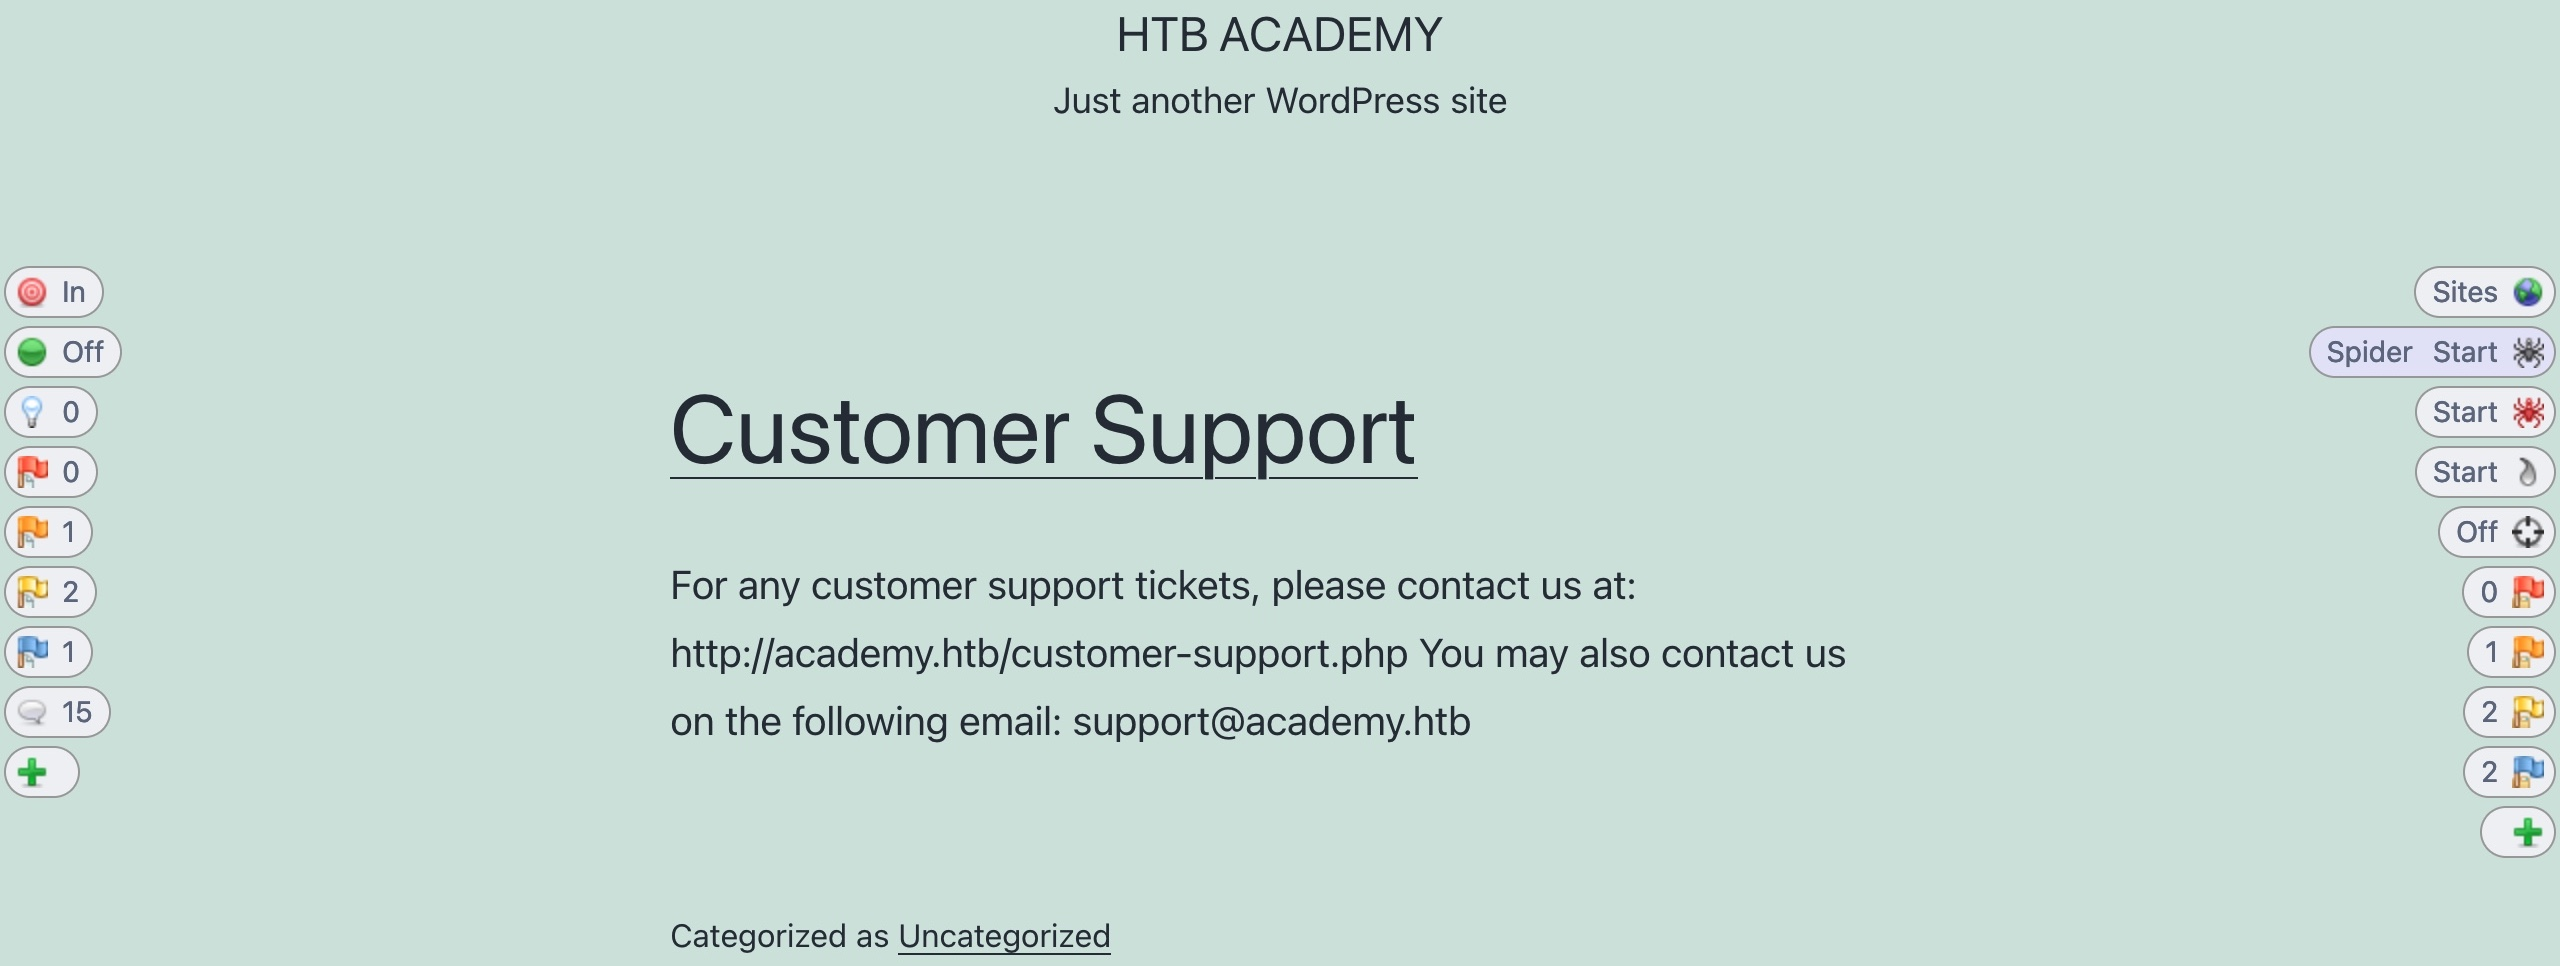
Once the scan is completed, you can check the Sites tab on the main ZAP UI, or we can click on the first button on the right pane Sites Tree.
1.9.2.2. Passive scanner
As ZAP Spider runs and makes requests to various end-point, it is automatically running its passive scanner on each response.
1.9.2.3. Active scanner
Once our site's tree is populated, you can click on the Active Scan button on the right pane to start an active scan on all identified pages.
The active scanner will try various types of attacks against all identified pages and HTTP parameters to identify as many vulnerabilities as it can.
1.9.2.4. Reporting
Finally, you can select Report>Generate HTML Report from the top bar, which would prompt us for the save location to save the report.
1.10. Extensions
1.10.1. Burp - BApp Store
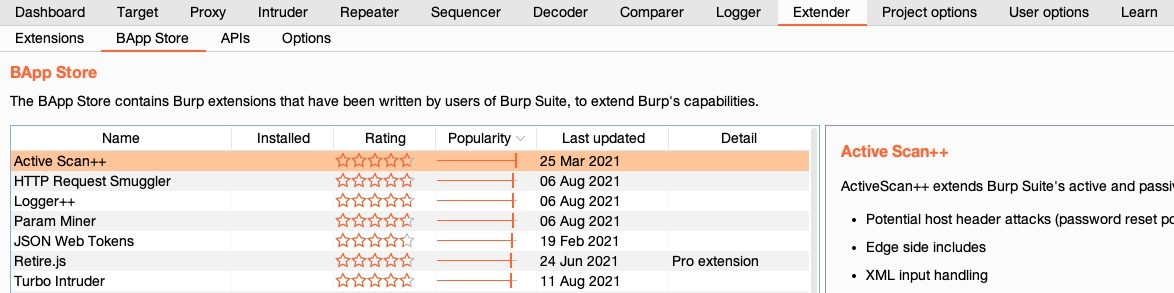
Burp allows extensibility through its Extender feature and its BApp Store.
1.10.2. ZAP Marketplace
ZAP also has its own extensibility feature with the Marketplace that allows us to install various types of community-developed add-ons.
